Acrylic. A sunset view from Connel, Argyll looking towards the Isle of Mull.
Friday, December 19, 2008
Tuesday, December 16, 2008
Henley-on-Thames
View from Connel Bridge
Friday, December 05, 2008
Nov - Dec 08 some works
"Bridge" Gouache 12"x16"
"Stalker Castle" Acrylic 16"x7" on board. This is how I think it looks through binoculars from the hillside a couple of miles to the south east. I have a photo I took a few years ago from the road below the hillside. Not as high up of course so I've moved the islands down a bit in this painting. Now the firs have grown taller its not so easy to see the castle from that bit of road.
An imaginary scene. Gouache 16"x12" Painted in layers.
"Loch Creran and Ben Sgulaird" Acrylic 16"x12"
Thursday, November 06, 2008
Sunday, October 26, 2008
Sunday, August 17, 2008
Some pencil sketches
These were done whilst away in Henley-on-Thames or travelling there. All are A5 size in pencil.
The maze at Grey's Court House near Henley.
Olympics - horse jumping.
St Helena's Church, Austerfield, Yorkshire.
Henley-on-Thames. The bridge and parish church.
River Thames ready for regatta rowing.
Killington Lake near Kendal, Cumbris. This was the view from our motel room at the motorway services.
Saturday, May 24, 2008
Sunday, April 13, 2008
Friday, March 28, 2008
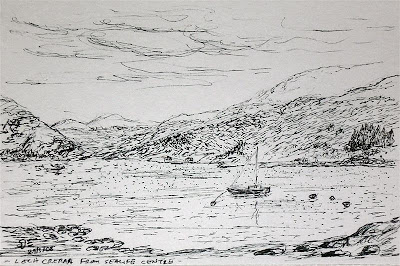
Loch Creran - Ink Sketch
Small sketch in ink (6"x4"). More of a practice than a proper work.
This is one of the views up Loch Creran from the Scottish Sealife Sanctuary which is about five minutes up the road from home. There was plenty of fresh snow on the hills which kept disappearing under cloud. As it was quite cold and showery I did the outline sketch on the spot and completed it back at home.
Monday, March 24, 2008
Glen Sallach
Monday, March 17, 2008
Highland scene
Sunday, March 09, 2008
"Inktense" one-day course
I went to a one-day course at the Appin Art Group about how to use the recently introduced Derwent Inktense pencils. We had demos from the tutor Tony Hogan and opportunities to practice using the medium.
(Remember to click on the images to view larger)
Below are my learnings and thoughts about Inktense.
Inktense look like ordinary colouring pencils. The pigment is a solid, water-soluble acrylic. Your picture won't look very impressive at first if you simply draw using the pencils. But add water from a wet brush to the lines and vibrant colour floods out, mixing and blending under the control of your brush. The final colour will be more intense than the solid tip of the pencil appears so its useful to keep an example palette handy.
Tony showed several ways of using the Inktense pencils - a typical painting would probably utilise them all. The pencils are generally used like watercolour pencils.
This means -
1) the colour can be drawn straight on to the paper and water added for strong acrylic-like effects;
2) the ink can be transferred to the brush by stroking the tip of a damp pencil, to add emphasis or to draw with the brush;
3) use it like watercolours by drawing a dry paper palette swatch then lifting the paint onto the wet brush for painting.
-----------------------------------
Strong acrylic technique.
eg a mountain scene - draw bold strokes using several colours with gaps between. Use a wet brush to stroke over. The colour floods out and intensifies while adjacents mix and blend. Good for general effects; harder to control for accuracy. If you are looking for accuracy of representation use the watercolour method (below) to lay down an underpainting and build up from it. You can paint light over dark with Inktense, but obviously life is easier if you don't have to do that. The technique is also good for large areas of underpainting in one colour before doing more detailed work using paint as below. (NB Inktense can be used this way on dark, even black paper.)
-----------------------------------
Watercolour technique.
On a spare piece of paper roughly draw some swatches of each colour. Use a brush to wet one half and draw the colour out to see different intensities. Then using a clean, damp brush rub it over the colour to lift some from the swatch at the intensity you desire and apply to the picture. You must wait a short while for the colour to dry then you can add another layer of colour. This good for building up intense colour using glazing technique. Remember to always clean the brush.
Bear in mind that the painted result will be more intense towards that part applied with the tip of the brush and this can result in unwanted strong edges. Not really a problem unless you don't notice it. Like watercolours it can be difficult to hide the edge later. Unlike watercolour though you can apply a stronger opaque colour over it (or cover with some white acrylic paint and restart the area).
-----------------------------------
Wet tip technique. Dampen the tip of the pencil. This softens the paint and it can e lifted off onto a brush. Useful for getting stronger colour onto the brush than the palette method. You can also use the pencil tip to apply colour directly. It tends to be pretty intense colour if applied directly though. One use of this trick is to add snow to tops of mountains - dampen the end of the white pencil then "roll" the pencil across the picture - don't draw as it won't work - its a kind of dabbing process which adds highlight spots.
--------------------------
My practice piece of work done during the course
Not very exciting, but a useful demo of how the intensity can be varied and colours overlaid - especially useful in this scene with the water reflections.
--------------------------
Back home, I made this piece
"Late afternoon, Bamburgh Castle, Northumberland"
Done on acrylic paper 12"x8". It's nearly all Inktense with some of the white highlights on the waves added using neat acrylic paint.
--------------------------
Overall Inktense should be a useful addition to one's art box - especially for plein aire painting. Combine Inktense with a Pentel Water Brush* and this could be one of the most convenient sets of kit for outdoor painting.
Steve Eccles, March 08.
*This is a synthetic tipped brush with refillable water chamber. Eliminates need for water jars etc. In the Pentel UK online catalogue its code is "Water Brush Product Code: FRH."
Sunday, March 02, 2008
"Natural Forms"
"Natural Forms"
Size A2 This an exercise to use pencil, ink and charcoal.
The objects should show some natural textures.
Hopefully you can see seaweed, a shell, an onion, some potatoes, a dried Honesty plant stem lying down and some dried wheat and allium heads in the vase. Behind the vase is a wood log and on the window ledge a cyclamen plant sits beside a copper kettle.
Wednesday, February 20, 2008
Tuesday, February 19, 2008
Barn at Benderloch
This Barn is at Selma, Benderloch, by the track leading down from the church to the beach. I painted it in Feb07 as part of an internet art group challenge. The setting is in summer with a bit of artistic licence.
Details: Painted in acrylics on heavy paper 16"x12".
I mainly used a knife with some finishing and glazing using brushes.
Subscribe to:
Posts (Atom)